LaTeX Environments
The following list of LaTeX environments are only the ones used in the creation of the
sample file number.tex. Of course there are many other environments that one can
learn and I recommend G. Gratzer's books for this based on their depth and readability.
\begin{align}...\end{align}:
The generic align environment looks like this:
\begin{align}
& = { } \label{ } \\
& = { } \label{ } \\
& = { } \notag
\end{align}
Notes:
-
the align environment is in math mode by default
-
& determine position of alignment
-
end each line (except the last) with \\
-
each equation is automatically numbered unless you include the \notag command
just before the end-of-line command \\
-
there are several variants to the align environment
-
You can cross-reference the equations of align if you have created a
label using \label{equation1} and then referncing it with \ref{equation1}
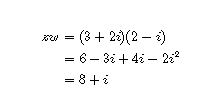
As an example, suppose the desired output is:
Cut and past the "generic align environment" above into you editor and simply insert the
necessary mathematics. In this case, we type:
\begin{align}
zw &= (3+2i)(2-i) \notag \\
&= 6-3i+4i-2i^2 \notag \\
&= 8+i \notag
\end{align}
\begin{tabular}...\end{tabular}:
The generic tabular environment looks like this:
\begin{tabular}{|c||c|c|} \hline
{ } & { } & { } \\ \hline \hline
{ } & { } & { } \\ \hline
{ } & { } & { } \\ \hline
\end{tabular}
Notes:
-
& separates the columns of the table
-
each line of the table ends with \\
-
end each line (except the last) with \\
-
if you want a horizontal line to separate one row from another then
use the command \hline at the end of the row
-
the argument of the command \begin{tabular}{...} specifies: (i) number of columns in the
table; (ii) whether the data is to be left justified (l), right justified (r) or centered (c);
and (iii) you may put a vertcal bar, |, between the l-r-c justifiers to put a vertical
line to separate the columns of the table.
-
there is a command multicolumn that allows you to build more sophisticated
tables where the horizontal and vertical lines don't go the entire length of the
table.
-
Notice in the above table we put two \hline commands after the first row and two
vertical bars after the first c in the argument of command \begin{tabular}. This
is to separate the labels in the first row and column from the actual table entries.
-
To label your table with a caption, you need to use insert the tabular environment
inside a table environment
-
In addition to "tabular" LaTeX is another table building environment called "tabbing"
As an example, suppose the desired output is:

Cut and past the "generic tabular environment" above into you editor and simply insert the
necessary mathematics. In this case, we type:
\begin{tabular}{|c||c|c|} \hline
{} & \textit{orient. preserving} & \textit{orient. reversing}
\\ \hline \hline
\textit{fixed points} & rotation & reflection \\ \hline
\textit{no fixed points} & translation & glide reflection \\ \hline
\end{tabular}
\begin{cases}...\end{cases}:
The generic cases environment looks like this:
\begin{equation}\label{ }
f(x)=
\begin{cases}
{ }, & \text{if $...$} \\
{ }, & \text{if $...$} \\
{ }, & \text{if $...$}
\end{cases}
\end{equation}
Notes:
-
the cases environment is not in math mode by default so in order to display the equation
we enclose it between
-
\[...\] or
-
$$...$$ or
-
\begin{equation}...\end{equation}.
If you want to label and cross-reference it you need to use the latter of these three.
-
& the "name" of the function, f(x) above, goes outside the cases environment
-
end each line (except the last) with \\
-
\\
-
& determines the position of alignment
-
the commas need to be typed in - they are not included by default
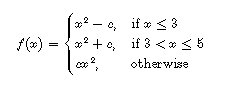
As an example, suppose the desired output is:
Cut and past the "generic cases environment" above into you editor and simply insert the
necessary mathematics. In this case, we type:
\[
f(x)=
\begin{cases}
x^2-c, & \text{if $x \le 3$} \\
x^2+c, & \text{if $3 < x \le 5$} \\
x^2-c, & \text{otherwise} \\
\end{cases}
\]
\begin{enumerate}...\end{enumerate}:
The generic enumerate environment looks like this:
\begin{enumerate}
\item
{ } \label{...}
\item
{ } \label{...}
\item
{ } \label{...}
\end{enumerate}
Notes:
-
Begin each new item that you want numbered with the \item command but don't end it with
\\
-
individual items can be labeled and cross-referenced in the usual manner with
the \label and \ref
commands.
-
There are two variant of the enumerate environment
-
The "itemize" environment works exactly the same way except it does not number the
items, but rather it produces a "bulleted" list.
-
The "description" environment also works the same way except that the \item command now
has an argument: \item{...} and whatever caption you put in the argument appears
in bold print at the beginning of the item instead of a number or bullet.
-
enumerate, itemize and description can be nested and can also be put inside
a theorem-like structure such as a Theorem, Definition, etc.
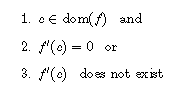
As an example, suppose the desired output is:
Cut and past the "generic enumerate environment" above into you editor and simply insert the
necessary mathematics. In this case, we type:
A \textit{critical number} of a function $f$ is a number $x=c$ satisfying:
\begin{enumerate}
\item
$c \in \text{dom}(f)$ \,and
\item
$f'(c) =0$ \, or
\item
$f'(c)$ \, does not exist
\end{enumerate}
\begin{CD}...\end{CD}:
The generic CD environment looks like this:
\[
\begin{CD}\label{...}
{top_left_corner} @> {top_label} >> {top_right_corner} \\
@ V{left_label} VV @ VV {right_label} V \\
{bottom_left_corner} @>> {bottom_label} > {bottom_right_corner} \\
\end{CD}
\]
Notes:
-
In order to use this environment you need to have the amscd package loaded which is
done with the \usepackage{amscd} command that goes in the preamble.
-
The environment is eclosed in
\begin{CD} and \end{CD}
-
end each row (except the last) with \\
-
"vertices of the diagram are refered to as "corners" above.
-
a horizontal row arrow is produced with (i) @>>> or
(ii) @> {...} >> or (iii) @>> {...} > depending on whether you want no label,
a label above the arrow or below the arrow respectively.
-
a vertical row arrow is produced with (i) @VVV or
(ii) @V {...} VV or (iii) @VV {...} V depending on whether you want no label,
a label to the left of the arrow or to the right of the arrow respectively.
-
Sometimes a commutative diagram is triangular in which case we typeset a square
diagram and use @= to indicate equality.
-
Commutative diagrams do not have to have the same number of row as columns but they
are on a rectangular grid.
-
There are more complicated programs available for more sophisticated diagrams.
- If you include a label then you can cross-reference your diagram with
the \label and \ref
commands.
As an example, suppose the desired output is:
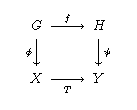
Cut and past the "generic commutative diagram environment" above into you editor and simply insert the
necessary mathematics. In this case, we type:
\[
\begin{CD}
{G} @> {f} >> {H} \\
@ V{\phi} VV @ VV {\psi} V \\
{X} @>> {T} > {Y} \\
\end{CD}
\]
\begin{figure}...\end{figure}:
The generic figure environment looks like this:
\begin{figure}[h]
\begin{center}
\scalebox{...}{\includegraphics{***.eps}}
\caption{...}\label{...}
\end{center}
\end{figure}
Notes:
-
In order to use this environment you need to have the graphics package loaded which is
done with the \usepackage{graphics} command that goes in the preamble.
-
The environment is eclosed in \begin{figure} and \end{figure}
-
The argument to \figure[...] has various options:
-
[b] stands for bottom of page
-
[t] stands for top of page
-
[h] stands for here
-
[p] stands for separate page
-
[!ht] stands for here or at the top no matter how it disobeys the rules
-
The argument to scalebox is a number between 0 and 1, 0.5 for example scaling the
figure 50%.
-
The graphics object must be in the same directory or folder as the source file and
the admissible graphics types depends on your printer. eps files work well with LaTeX.
-
The caption appears below the figure, the figure is automatically numberes and if you use
the \listoffigures command all this information appears in the table listing all the
figures in your document.
-
The label must be put at the end of the caption and the figure may be cross-referenced
in the usual way with the \label and \ref
commands..
-
Commutative diagrams do not have to have the same number of row as columns but they
are on a rectangular grid.
-
There are more complicated programs available for more sophisticated diagrams.
As an example, suppose the desired output is the graph of a quartic polynomial that you
have generated with a computer algebra system:
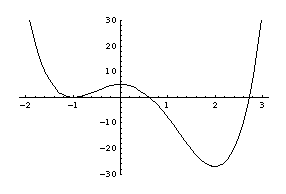
Cut and past the "generic figure environment" above into your editor and simply insert
the necessary code in the braces. In this case, we type:
\begin{figure}[h]
\begin{center}
\scalebox{0.80}{\includegraphics{quartic.eps}}
\caption{Quartic polynomial with }\label{quartic}
\end{center}
\end{figure}
\begin{table}...\end{table}:
\begin{table}[h]
\begin{center}
Use the tabular environments and put
your table here.
\caption{...}\label{...}
\end{center}
\end{table}
\begin{Thm}...\end{Thm}:
-
Your preamble should include the amsthm package
and both the theoremstyle command and
\theoremstyle command commands.
-
Typeset your
theorems, propositions, lemmas, corollaries, definitions, remarks inside the appropriate
environment \begin{Thm}...\end{Thm} or \begin{Def}...\end{Def} and the formating and style
will be determined by the theoremstyle command.
-
You can label and cross-reference the theorem-like structure in the usual way with the
\label and \ref
commands.
\begin{equation}...\end{equation}:
LaTeX knows that it is typesetting math if it sees $...$. If you want to "display"
math, centered on a separate line, then you include the code between double dollar
signs $$...$$. As an alternative to $$...$$ and more in the spirit of LaTeX, one can
use \[...\]. There is a third a final way to display a math. However, this last method
allows you to label your equation and cross-reference it with
the \label and \ref
commands. Thus the generic equation environment looks like:
\begin{equation}\label{...}
***
\end{equation}
\begin{center}...\end{center}:
This is a straightforward environment that simply centers whatever you put inside it.
Variant of this environment are \begin{flushleft}...\end{flushleft} and
\begin{flushright}...\end{flushright}
\begin{proof}...\end{proof}:
Provided you are using the amsthm package , after you
have stated the theorem, proposition, Lemma, etc in a \begin{Thm}...\end{Thm}
environment, then you can include the proof inside the environment
\begin{proof}...\end{proof}. This will determine the spacing before and after the
proof, provide the word proof in italics and include the
end of proof symbol at the end of the last line.
\begin{abstract}...\end{abstract}:
In the topmatter of your article just after the date you can type the abstract to your
document in this environment and it both indents and chooses a smaller font to typeset
the abstract.
\begin{document}...\end{document}:
The body of your document is contained between these commands. The only commands that
appears before them are those in the preamble such as
documentclass ,
newtheorem ,
usepackage and your macros via
newcommand .
\begin{quote}...\end{quote}:
If your document contains a quote you can include it in this environment and it will
be properly indented and can be cross-referenced with
the \label and \ref
commands